How to Set Up a Dual-PC Streaming Setup: A Complete Guide for Smooth, Pro-Quality Streams
Streaming has grown fast in recent years. Whether you are sharing games, podcasts, or creative work, your audience expects a clear and smooth stream. If you want better quality and less lag, using two PCs for streaming can help a lot.
This guide will explain what equipment you need and how to set it up step by step. By the end, you will be able to run a professional and steady stream without trouble.
What Is a Dual-PC Setup?
A dual-PC setup means you use two separate computers
- One PC is for gaming or creating content (called the gaming PC).
- The other PC is for streaming and sending your video online (called the streaming PC).
Each PC focuses on its own job. The gaming PC runs your games or apps smoothly without being slowed down by the stream. The streaming PC encodes the video and sends it out to your viewers.
Why Use Two PCs?
There are several benefits:
- Better Performance: The streaming PC handles the heavy work of encoding the video, which frees up your gaming PC to run your games faster and smoother.
- Higher Quality: You can stream at higher bitrates and resolutions, giving your viewers a better picture.
- More Stability: If one PC has issues, the other can keep running.
- Less Heat and Noise: Each PC works less hard, so both stay cooler and quieter.
If your stream stutters during fast games, this setup may fix the problem.
Quick Setup Steps
- Prepare two PCs: one for gaming and one for streaming.
- Install OBS Studio on the streaming PC.
- Connect the gaming PC to the streaming PC using a capture card.
- Set up audio routing using software or hardware.
- Adjust OBS settings for best quality.
- Test everything before you go live.
What Gear Do You Need?
Here is what you will need:
- Two PCs: The gaming PC needs a good graphics card. The streaming PC needs a good CPU like an Intel i5 or Ryzen 5.
- Capture Card: Devices like Elgato HD60 X or AVerMedia Live Gamer let the streaming PC see what your gaming PC is showing.
- OBS Studio: This free software runs on your streaming PC to manage your stream.
- Audio Routing Software: Programs like Voicemeeter Banana help send sound between PCs.
- Audio Interface or Mixer: Optional, but good if you want pro-level audio control.
- Cables: HDMI and audio cables to connect everything.
Pro Tip: Use wired Ethernet cables on both PCs to ensure stable internet connections.
How to Connect the Capture Card
Here is how to connect your PCs:
- Plug the HDMI output from your gaming PC into the capture card’s input.
- Connect the capture card’s USB cable to your streaming PC.
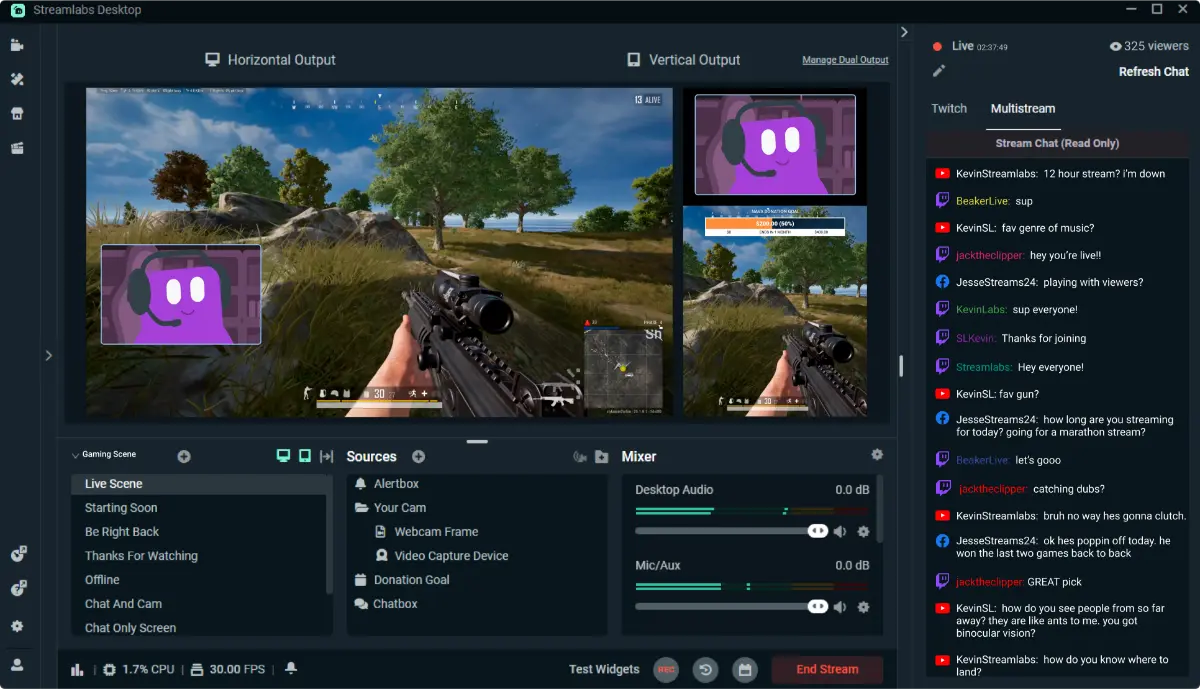
- Open OBS on the streaming PC. Add a “Video Capture Device” source. You should see your gaming PC’s screen inside OBS.
This setup allows the streaming PC to record your gameplay without delay.
Setting Up OBS on the Streaming PC
Configure OBS like this.
- Video Settings: Set the base resolution to 1920×1080 or match your game’s resolution.
- Output Settings:
- Use the x264 (CPU) encoder or NVENC (GPU) if your streaming PC has a good graphics card.
- Set bitrate to around 6000 kbps for 1080p at 60 FPS. Adjust the bitrate depending on your internet speed and streaming platform.
- Audio Settings: Use the capture card and audio routing software to capture game sound and your microphone.
Important: Only run OBS on the streaming PC. Do not run OBS on both PCs.
How to Route Audio Correctly
Audio can be the hardest part to get right. Here are two ways:
- Hardware Audio Interface: Use a USB mixer or audio interface such as GoXLR or Focusrite Scarlett. Connect your microphone and headphones to the mixer. Then, send separate audio signals to each PC.
- Virtual Audio Routing Software: Use Voicemeeter Banana on the gaming PC. Route game sound and microphone audio through virtual cables to the streaming PC.
Always test your audio levels. Use headphones to check your stream’s sound and avoid echo or missing audio.
Test Your Setup Before Going Live
Before streaming to your audience:
- Check your game and microphone volume levels.
- Make sure your webcam and audio are in sync.
- Confirm the stream runs smoothly with no dropped frames.
- Test your alerts and overlays to ensure they show correctly.
Use OBS’s statistics panel and Twitch Inspector to find any issues.
Tips for a Better Stream
- Use OBS’s Sync Offset option to fix any delays between video and audio.
- Leave 20-30% of your upload bandwidth free to prevent lag.
- Make sure your streaming PC is well cooled with good airflow or liquid cooling.
- Use push-to-talk or noise gates on your mic to reduce background noise.
- Disable in-game audio monitoring to avoid hearing your own voice twice.
Tools to Improve Your Streaming Workflow
- Use Scenes and Hotkeys in OBS to switch your stream layout easily without leaving your game.
- Try an Elgato Stream Deck to control your stream with the push of a button.
- Record your gameplay locally on your gaming PC for high-quality footage.
- Use chat bots and alert systems to engage viewers and improve your stream’s look.
Frequently Asked Questions (FAQs)
Do I need an expensive streaming PC?
No. A streaming PC with a good CPU and USB 3.0 ports is enough.
Can I stream in 4K with a dual-PC setup?
Yes, if you have a capture card that supports 4K passthrough and a fast internet connection (at least 15-20 Mbps upload).
Is OBS or Streamlabs better for dual-PC streaming?
OBS Studio is lighter and more customisable, making it a better choice for dual-PC setups.
Can I stream and game on the same PC instead?
You can, but this often causes lag. Two PCs give better performance and more headroom.
Final Thoughts: Are You Ready to Stream Like a Pro?
Setting up a dual-PC streaming system may seem complicated at first. But with the right equipment and a bit of practice, you will enjoy smoother gameplay and better-quality streams. Many serious streamers use this method to give their audience the best experience.
Try it out today! Run a private test stream, adjust your settings, and then go live. Your viewers will appreciate the upgrade.