How to Set Up OBS Studio for Streaming
You’ve decided to start streaming. Maybe you want to play games, chat, create art, or share your passion. You have your microphone and webcam ready. Now, you need the right software to bring it all together.
OBS Studio is that software. It’s free, open-source, and trusted by many streamers worldwide. It works on Windows, macOS, and Linux. With OBS, you can control how your stream looks and sounds. It might seem tricky at first, but setting it up right will help you make smooth, professional broadcasts.
This guide will walk you through every step to set up OBS Studio. You’ll learn how to install it, connect to your streaming platform, adjust your video and audio, and create scenes. Let’s get started.
Step 1: Download and Install OBS Studio
Go to the official website: Pick the version for your computer — Windows, macOS, or Linux. Download it and follow the instructions to install.
Make sure you use the official site. Other sites might have unwanted software.
When you open OBS Studio for the first time, an auto-configuration wizard will appear. This tool helps set up your stream based on your system and internet speed.
Choose “Optimize for streaming.” Then enter your screen resolution and frame rate. If you don’t know these, use 1920×1080 and 30 frames per second (FPS). OBS will test your system and suggest settings. This gives you a good starting point.
Step 2: Connect to Your Streaming Platform

To send your stream online, link OBS to your platform. Go to Settings > Stream in OBS.
Choose your platform: Twitch, YouTube, or Facebook Live.
You can log in directly or use a stream key.
For Twitch, logging in with OAuth is easiest. This connects your account without needing a key.
If you prefer the stream key method, get your key from your Twitch dashboard. Paste it into OBS. Keep your stream key secret — anyone with it can stream on your channel.
Other platforms usually use stream keys, too. Just find your key and enter it.
Step 3: Adjust Output Settings
Output settings control your stream quality.
Go to Settings > Output and select “Simple” mode.
Set your Video Bitrate between 2500 and 5000 kbps. Bitrate affects how clear your stream looks. Higher bitrate means better quality but needs faster internet upload.
Check your internet speed using Speedtest.net. Make sure your bitrate is about 75% or less of your upload speed to avoid lag.
Choose your encoder. Use x264 to encode with your CPU, or NVENC if you have a modern Nvidia graphics card. NVENC uses your GPU and often works better.
Set audio bitrate to 160 kbps for clear sound.
Step 4: Set Video and Audio Options
Go to Settings > Video.
Set the Base (Canvas) Resolution to your screen size (usually 1920×1080).
Set the Output (Scaled) Resolution to what viewers see. If your computer or internet is slow, use 1280×720.
Choose your frame rate (FPS). 30 FPS works well for most. If your system is strong, try 60 FPS for smoother video.
For audio, go to Settings > Audio.
Set sample rate to 44.1 or 48 kHz.
Choose your microphone under Mic/Auxiliary Audio.
Choose your speakers or headphones under Desktop Audio.
Test your mic volume. Aim for peaks around -10 to -5 decibels. Too loud or too quiet can hurt sound quality.
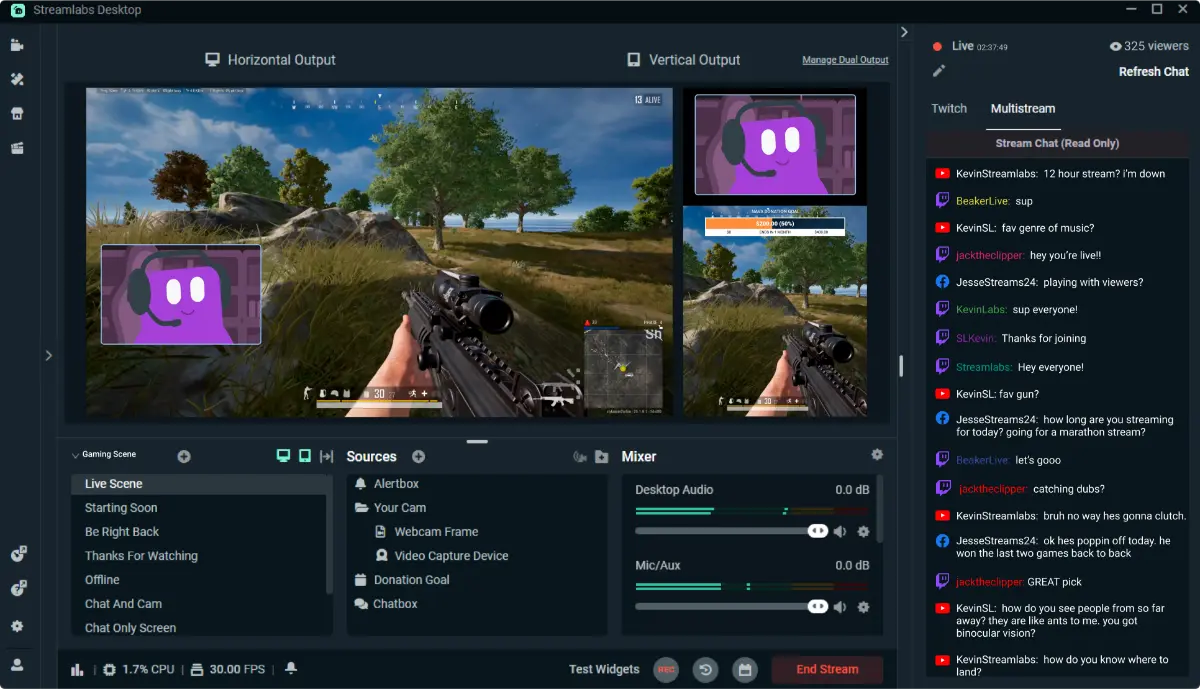
Step 5: Create Scenes and Add Sources
Scenes are different views you show during your stream.
For example, you might have a “Starting Soon” scene, a “Gameplay” scene, and a “Just Chatting” scene.
Each scene has sources — things you show on screen.
Sources include your screen, a game, your webcam, images, text, or alerts.
To add a source, click the “+” button in the Sources box and pick the type.
For games, use Game Capture
For your webcam, use Video Capture Device.
You can drag and resize sources on the screen.
The order matters — sources on top cover those below.
Step 6: Customize Your Stream Layout
Good streams often have overlays — graphics around your webcam, alerts, or chat boxes.
You can find free overlay packs on sites like NerdOrDie, StreamElements, or OWN3D.
Add overlays as images or browser sources in OBS.
You can also add filters.
Right-click your mic source to add noise suppression or gain filters.
Right-click your webcam to add color correction or green screen effects.
Keep your layout neat and clear. Don’t overcrowd your screen.
Step 7: Test Your Stream
Before going live, run a private test.
On Twitch, add ?bandwidthtest=true at the end of your stream key to stream privately.
Check if your audio and video sync.
Watch for dropped frames or lag.
In OBS, open the Stats window to see CPU use, FPS, and bitrate.
Lower your bitrate or resolution if you have issues.
Step 8: Tips for Better Streaming
Use Studio Mode to preview scenes before showing them live.
Set hotkeys in Settings > Hotkeys for quick control like starting/stopping the stream or switching scenes.
Try control apps like Stream Deck or Touch Portal to manage your stream from a phone or tablet.
Explore OBS plugins like StreamFX for cool effects or OBS WebSocket for remote control.
Use the Closed Captioning plugin to add subtitles for viewers who need them.
Conclusion: Ready to Stream!

OBS Studio may seem complex, but step-by-step, it’s easy to set up.
Your first streams don’t have to be perfect. Start simple, learn, and improve over time.
With OBS set up, you can share your passion and grow your audience.
Now, hit “Start Streaming” and show the world what you’ve got!